The brick on the exterior of my house has always vexed me. It’s not, like, cool New York City brownstone brick. It’s like bright-orange 1965 brick. Regardless of how you feel about 1960s decor choices (and personally, I’m generally pretty positive about them): it’s bad.
I’m in the process of making over my entire house exterior because LORD is it ever hideous, and the original plan with the brick “accent wall” was to paint it to match the primary color of the house. Why? Because I couldn’t think of anything else to do with it. But to me, the problem with painted brick is it looks like…you didn’t want brick. And so you painted it so that you could pretend you didn’t have brick. Which is fine, I guess, but if I’m putting all this money and effort into an exterior renovation, I’d rather the focal point of my home not give off an “Eh, this’ll do” vibe. …You know?
I started thinking I might want to try whitewashing the brick instead of just painting it, and when I mentioned this to my friend Erin (the same friend who inspired yesterday’s DIY fountain post), and she said, “Oh, why don’t you try a German Smear?”
…excusemewhat?
See, to me “German Smear” sounds like a porn that I don’t want to see (or maybe that I really, really do, depending on my mood and whether I’ve eaten recently). Or maybe an extremely delicious sandwich. But probably not something I want to have happen to my house.
Turns out a German Smear is sort of a whitewashing/distressing combination approach to making over ugly brick. You smear (ew, that word) white mortar paste over the brick, and then use burlap to rub most of it off juuuuuust before it dries completely, thereby lightening the color of the brick (or whitening it entirely, depending on how much mortar you apply) and adding a roughened layer to its surface. The photos online looked almost exactly like what I wanted to do.
Almost. Not quite.
So I added one more step to the process, and it is this step that I think officially makes me a real-life, brick-making-over GENIUS. (Medals and high-fives accepted via carrier pigeon.)
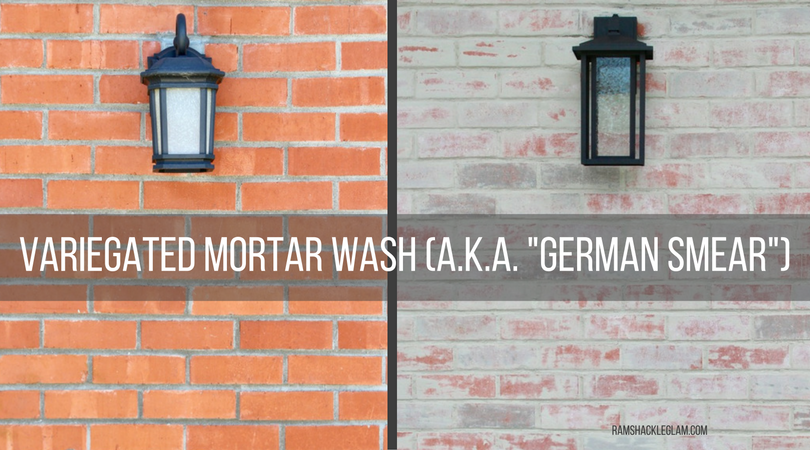
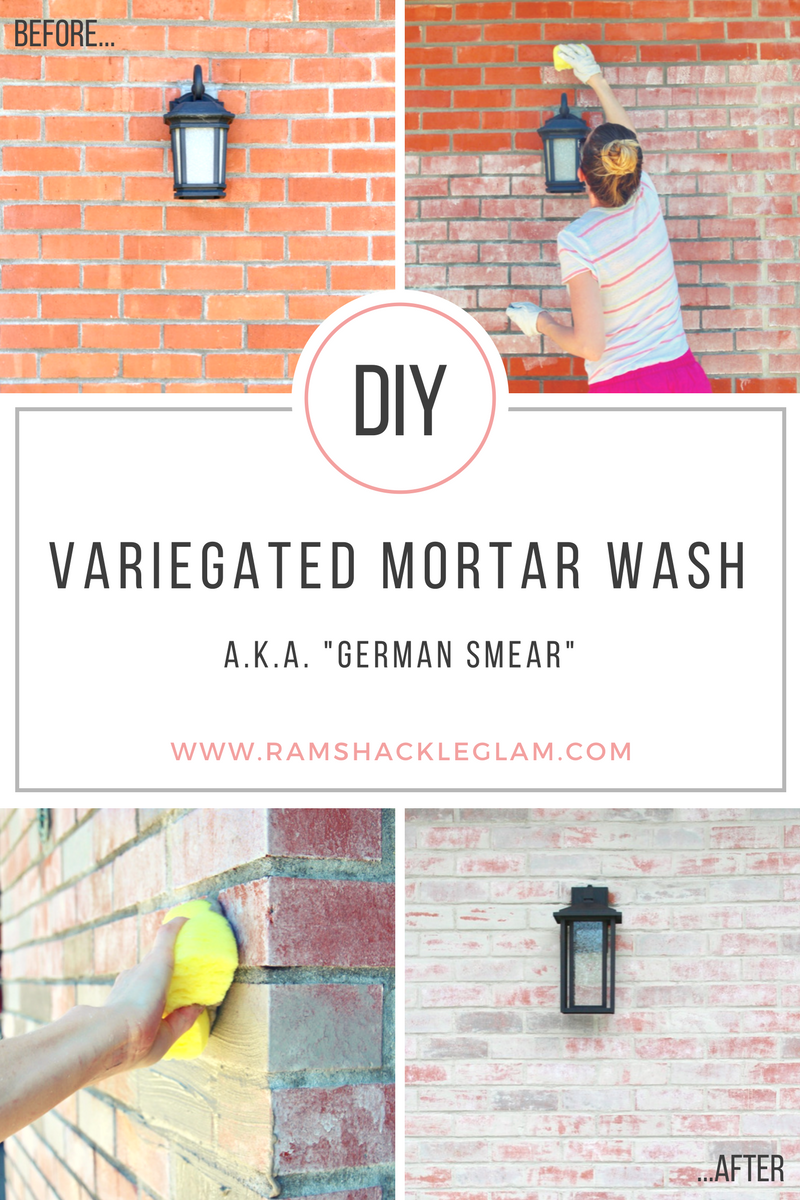
My added step: I pre-coated the brick with thinned-out white paint, then applied two shades of thinned-out grey paint to random bricks before starting the mortar wash process. This gave the bricks would have that variation in tone that you see in authentic old brick, and made the whole thing look warm and interesting and generally awesome. It is literally one of my all-time favorite DIYs I have ever done, and so I am going to go ahead and name it: I am calling it the Variegated German Smear, which is a badass name for a home renovation procedure, if you ask me.
OK. So first, let’s please gaze upon the hideousness of my exterior brick as it was when we moved in. And for two years afterwards.
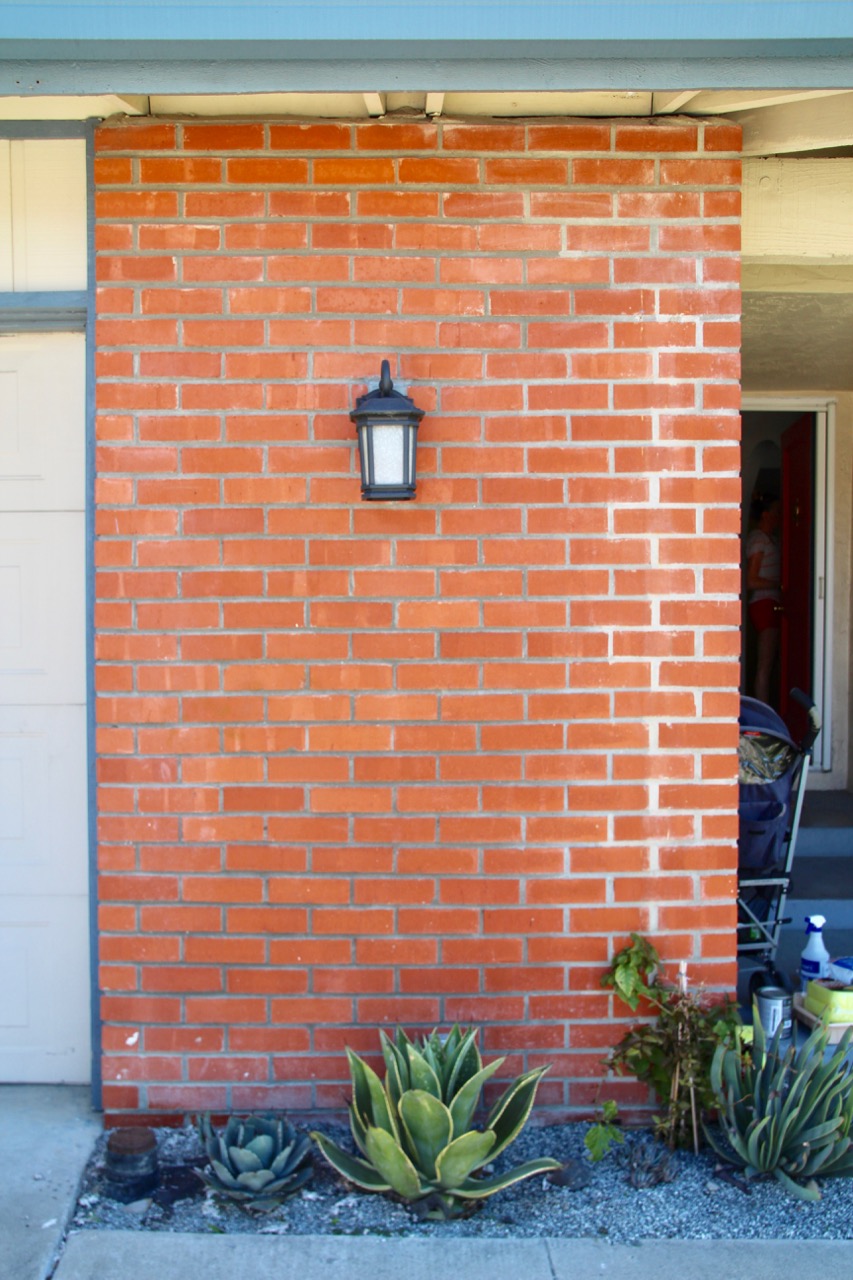
Bad.
Shall we fix it? Perhaps with a Variegated German Smear?
We shall.
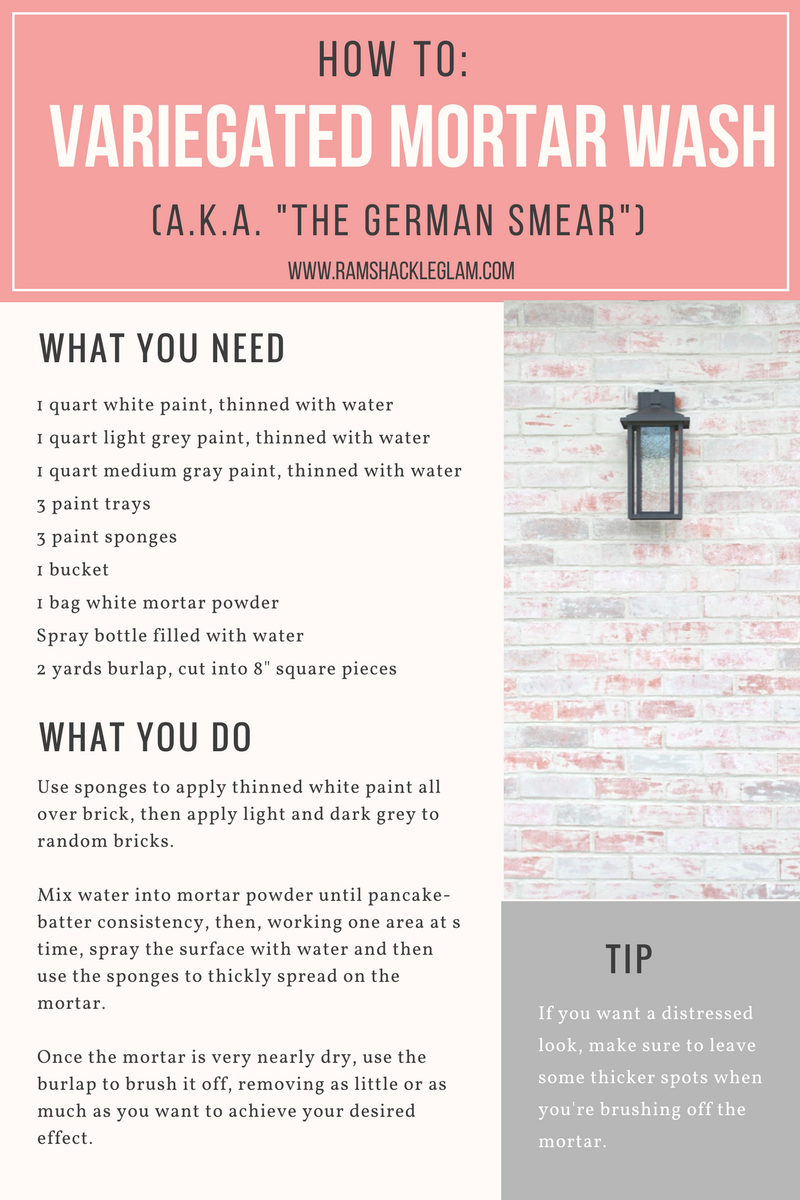
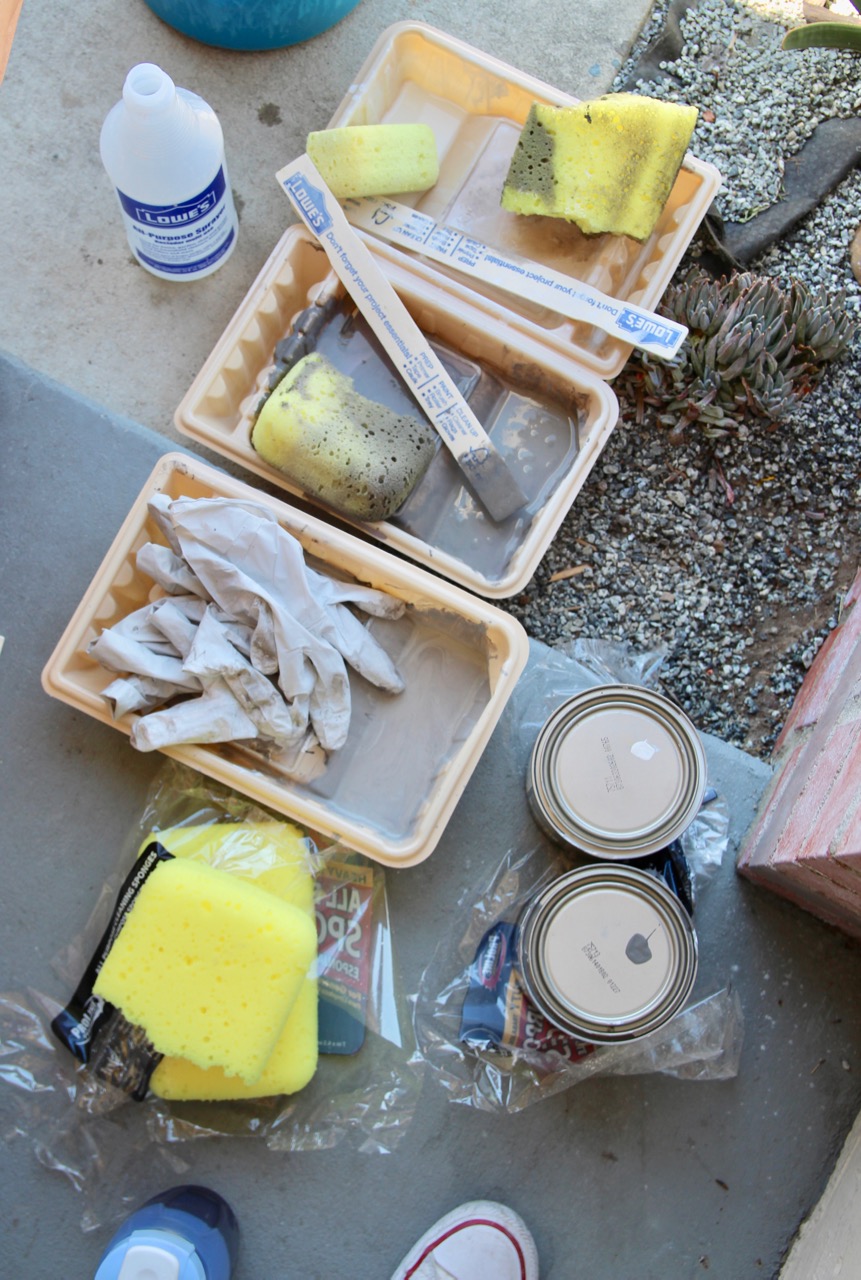
What You Need:
- 1 quart white paint (I used Valspar Du Jour)
- 1 quart grey paint (I can’t recall the exact shade I used, but any medium grey will work)
- 3 plastic paint trays
- 3 paint sponges
- 1 bucket
- 1 bag white mortar powder (not pre-mixed) – I bought a 25lb bag and only needed about half, but it’s better to be safe than sorry
- A couple of yards of burlap, cut into pieces approximately 8″x8″ (don’t try to substitute other materials for burlap; it’s really the best tool for this job)
Note: You’ll have to adjust these quantities depending on the size of the space you’re working with, of course. These were the approximate quantities I used for a 5’6″x9′ wall.
The Step-By-Step:
To begin, pour some of the white paint, some of the grey paint, and a mix of the white and grey paint (to make a light grey) into the three paint trays. Add water to each to thin out each paint color (a 1:1 ratio worked for me).
Now, using a sponge, apply the thinned-out white paint all over the surface of the brick. The point is to create a whitewashed effect, not to cover it completely, so if you need to thin out the paint with more water, that’s fine.
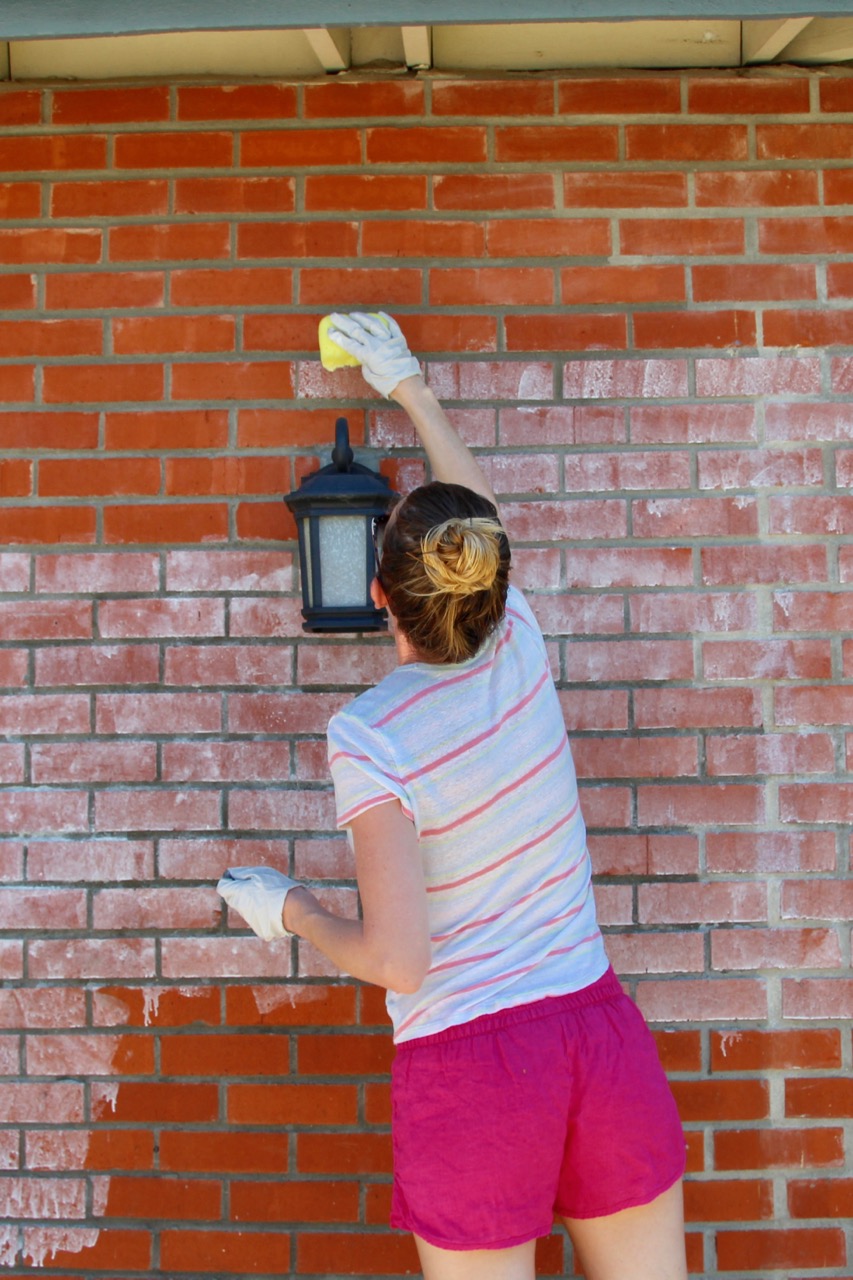
(That’s my friend Erin, being an awesome friend.)
Here’s what the brick looked like after a coat of whitewash.

Already less terrible.
Once the whitewash has dried for a few minutes (it doesn’t need to be completely dry), use the other two sponges to apply the thinned-out light grey paint and the thinned-out medium-gray paint to random bricks. Be careful to confine the colors to individual bricks, but don’t worry too much about keeping the lines precise; the mortar wash will cover most mistakes.
Honestly, I considered stopping at this point, because the effect is kind of great-looking already. (Oh, and tip: I found it worked best to apply the lighter grey to about twice as many bricks as the darker grey – it created the most natural effect.)
I loved this look, but still wanted the brick to look more authentically aged and wanted the grout to be way lighter.
So I decided to get my German Smear on.
To create the mortar wash, pour about three cups of mortar powder into your bucket (which will probably be ruined at the end of this; sorry), and add enough water that you get a sort of pancake-batter consistency.
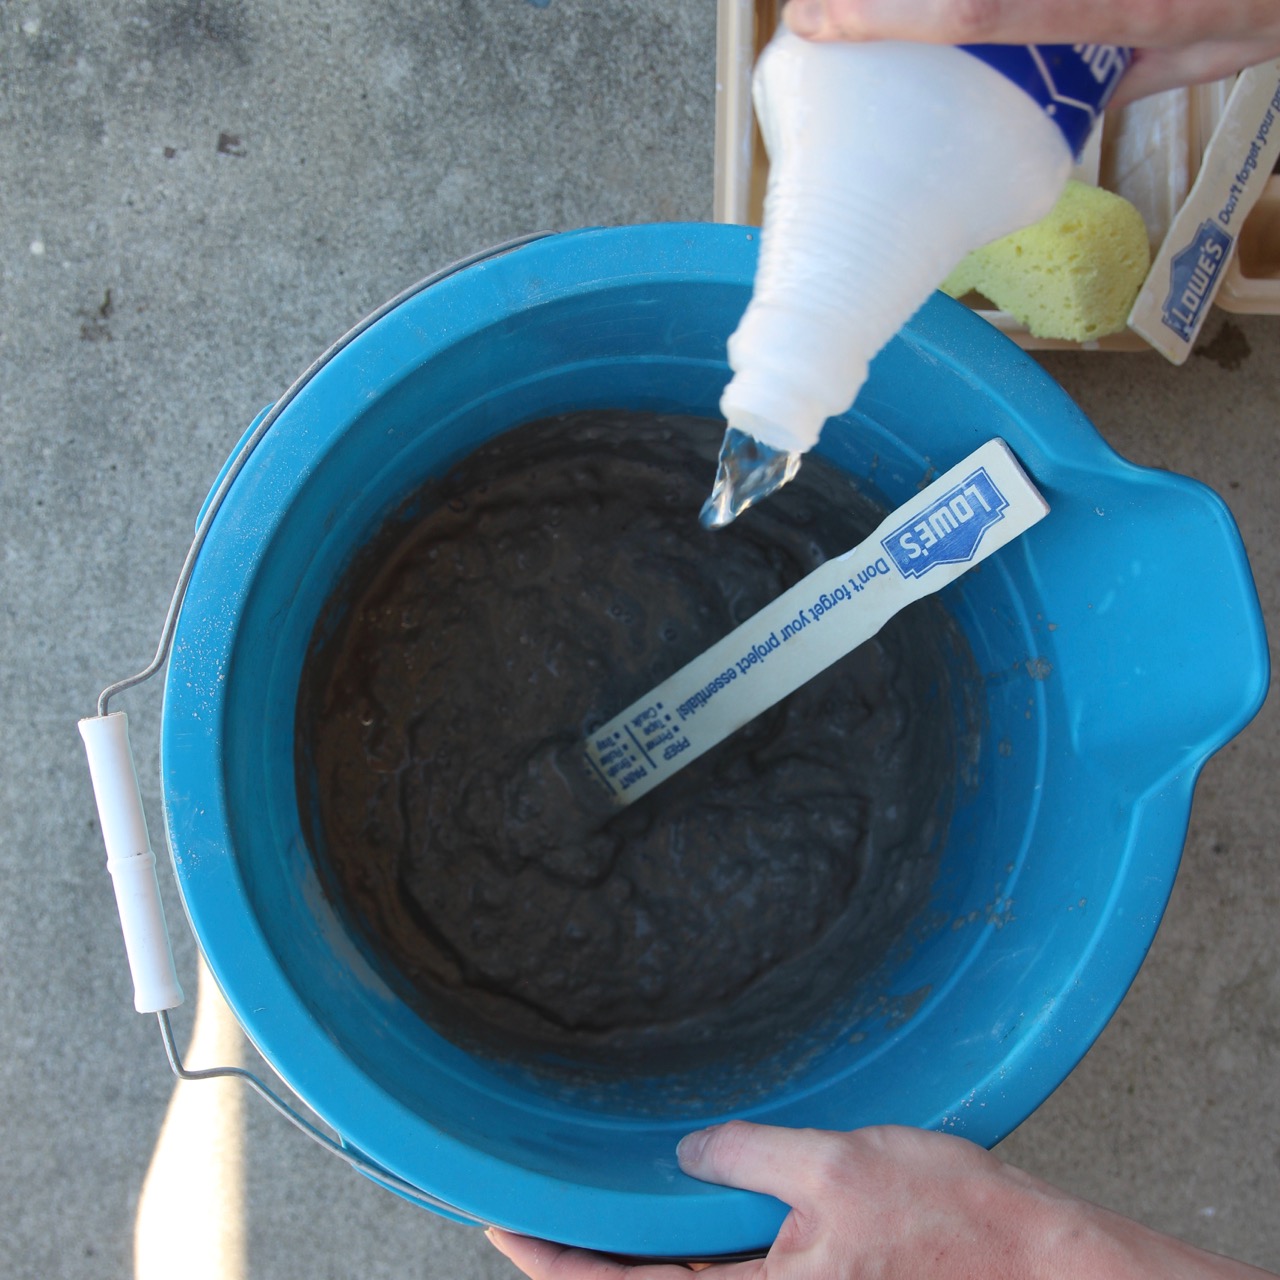
Just eyeball it; as long as it’s thick enough to stick to the surface that you’re trying to cover (but not so thick you can’t work with it), you’re good.
Now, working one area at a time, spray the surface of the brick with water, then use a sponge (the ones you painted with are fine) to smear on the mortar. If you run out of mortar mixture at any point, just make more (you don’t want to make too much to start with, because it’ll harden over time and become impossible to work with).

Really get in there with the sponge, making sure to cover all the grout between the bricks. And don’t worry about putting too much on – you want good, thick coverage, and you’re going to end up brushing a lot of it off later anyway.
Important: Don’t try to do too large of an area all at once, because you’re going to have to move pretty quickly to get the mortar off once it’s almost dry.
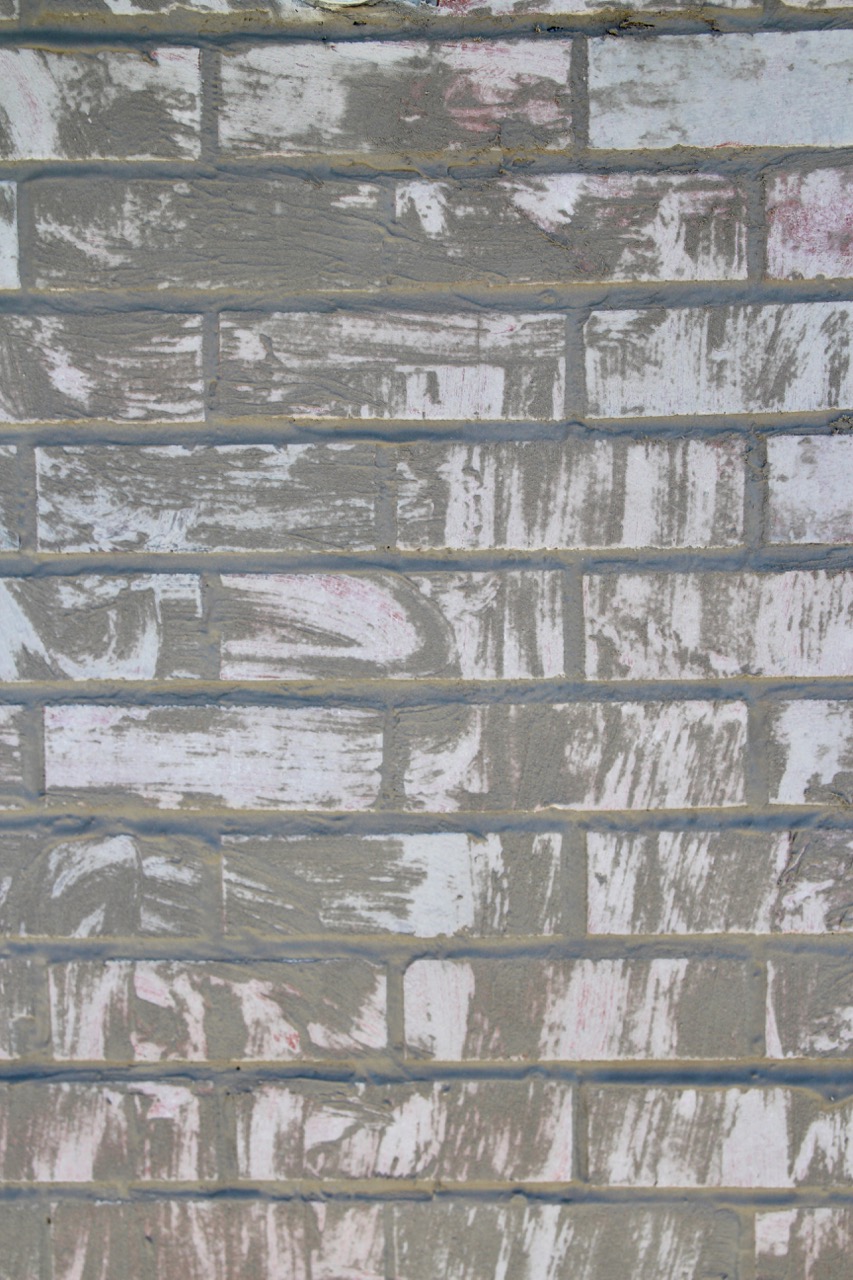
Once the mortar is alllllllmost dry, start rubbing it with the burlap (and be prepared to be sore the next day, ohhhh my goodness). With some pressure, most of the mortar should brush off like thick dust – but if you wait too long past this point, it’ll be full-on dry, and you won’t be able to get it off at all. So once it hits the right consistency, move quickly.
You can remove as much or as little mortar as you like, depending on how variegated you want the end result to be (I wish I had taken more off on the dark grey bricks for heavier contrast, but c’est la vie).
Tips:
- If you want a distressed look, make sure not to brush the mortar down until you have a completely smooth surface. Leaving a few thicker areas and gloppy spots makes the brick look authentically old.
- If you’re working with a friend – and this is suuuuper important – make sure to switch sides every once in awhile. You may have pretty different techniques with both the paint and the mortar wash, and it’s best to mix together your styles so that the overall effect is consistent.
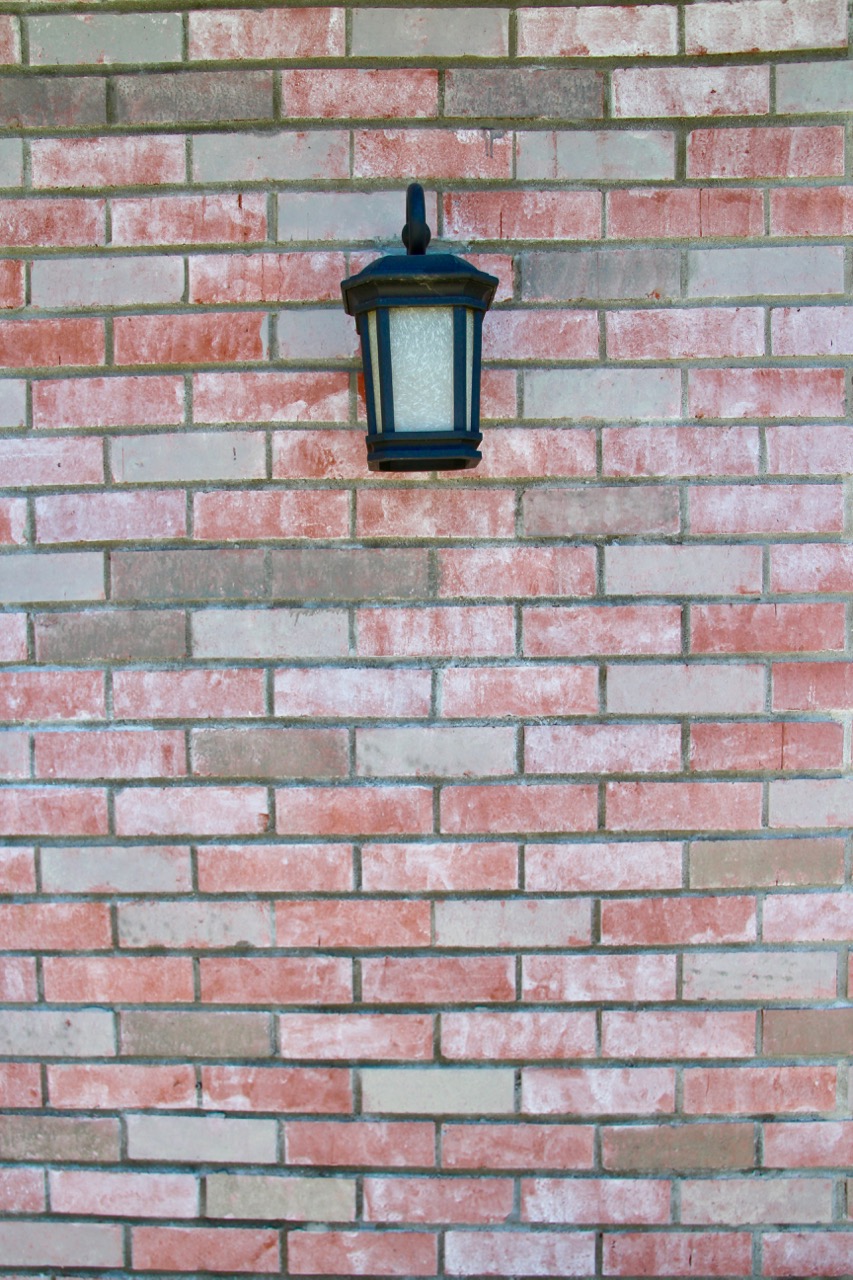
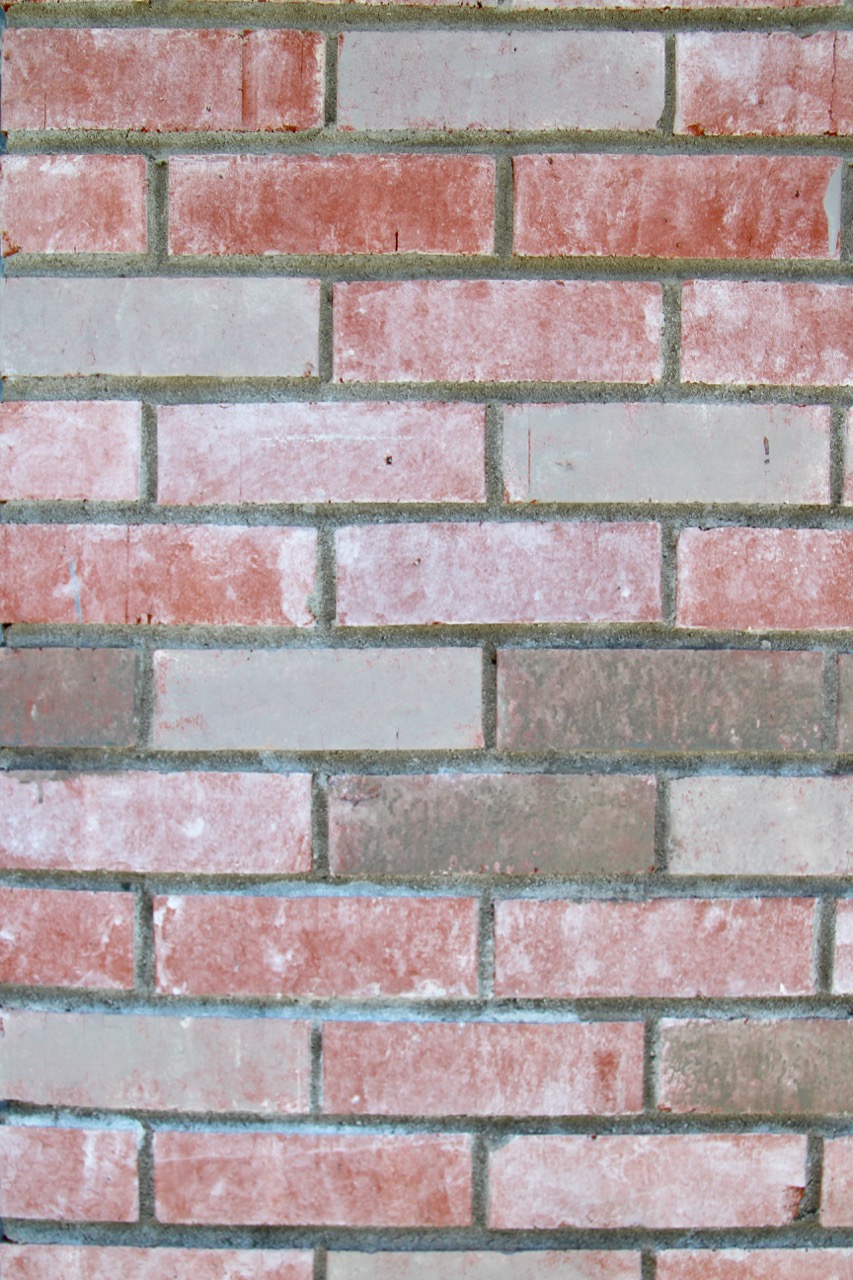
Here’s the final product:
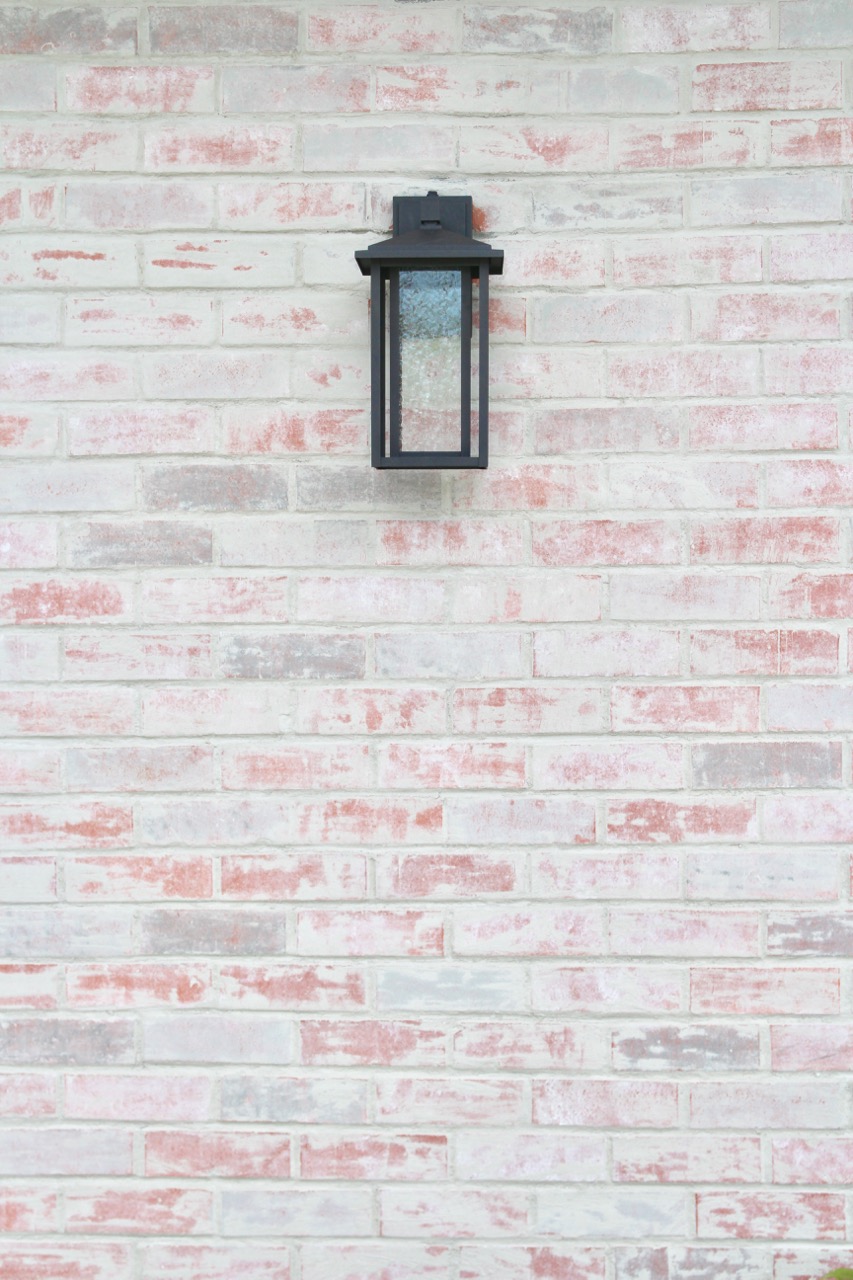
I think that adding the whitewash and grey accent paint to the brick prior to doing the mortar wash was totally what made this work – it created depth and interest and I completely love it. Like everyone-with-ugly-brick-should-try-this-style love it.